Battery switch on travel trailer function is crucial for managing your RV’s power. Understanding how it works—from the different switch types (single-pole, double-pole, etc.) to safe operation and troubleshooting—is key to preventing dead batteries and electrical issues. This guide breaks down everything you need to know about your travel trailer’s battery switch, helping you keep your RV running smoothly.
We’ll cover everything from choosing the right type of switch for your needs to performing basic maintenance and tackling common problems. Think of this as your handy guide to keeping your RV’s electrical system healthy and happy!
Battery Switch Types in Travel Trailers: Battery Switch On Travel Trailer Function
Choosing the right battery switch for your travel trailer is crucial for managing your power sources and protecting your electrical system. Different types offer varying levels of control and safety features. Understanding these differences will help you select the best option for your needs.
Single-Pole Battery Switches
Single-pole switches offer the simplest form of battery control. They essentially act as an on/off switch for a single battery. This means you can disconnect one battery from the trailer’s electrical system, but you can’t isolate different batteries from each other. They are inexpensive and easy to install, making them suitable for trailers with only one battery.
However, they lack the flexibility of more advanced switches. A single-pole switch is a good choice if you only have one battery to manage and don’t need to isolate it from other electrical components.
Double-Pole Battery Switches
Double-pole switches provide more control than single-pole switches. They allow you to independently control two separate batteries (like a house battery and a starting battery), switching them on or off individually. This is a significant advantage in terms of safety and power management. You can isolate a faulty battery without affecting the other. They are relatively inexpensive and commonly found in travel trailers.
The increased control over multiple batteries makes this a popular choice for many RVers.
Double-Pole Double-Throw (DPDT) Battery Switches
DPDT switches offer the most comprehensive control. These switches can connect either battery to the trailer’s electrical system individually, or even both simultaneously. This allows for a combination of power sources. They provide greater flexibility and the ability to prioritize one battery over another. While more complex to install and slightly more expensive than other types, the advanced control offered makes them worthwhile for those who require precise management of their power sources, particularly those with larger trailers or higher power demands.
Comparison of Battery Switch Types
| Feature | Single-Pole | Double-Pole | Double-Pole Double-Throw (DPDT) |
|---|---|---|---|
| Number of Batteries Controlled | One | Two (independent control) | Two (individual or combined) |
| Isolation Capability | None | Yes (each battery can be isolated) | Yes (each battery can be isolated, or both can be combined) |
| Cost | Low | Medium | High |
| Application Suitability | Small trailers with one battery | Most travel trailers with two batteries (house and starting) | Large trailers, complex electrical systems, or users needing maximum control |
Function and Purpose of the Battery Switch
The battery switch in your travel trailer is a crucial component of its electrical system, acting as the central control for your power sources. It allows you to selectively connect and disconnect your house batteries from the rest of the trailer’s electrical system, and also manage the connection between your house batteries and the vehicle’s chassis battery. This seemingly simple switch offers significant benefits in terms of power management and protection.The battery switch primarily manages the flow of power between your travel trailer’s house batteries (used for interior lights, appliances, and other 12V systems) and the chassis battery (which powers the vehicle’s starting system).
So, you’re an audiophile who loves to travel? Awesome! Check out this guide on creating the perfect audiophile travel setup to ensure your ears are happy on the go. Don’t forget the important stuff though – getting Aon travel insurance is crucial for peace of mind, protecting your gear and yourself while you’re exploring new places.
Having great sound and solid insurance makes for a truly unforgettable trip!
In the “off” position, it completely isolates the house batteries, preventing any drain on them from parasitic loads within the trailer, or from accidentally connecting them to the chassis battery. When switched to the “on” position, it connects the house batteries to the trailer’s electrical system, allowing you to power your appliances. Some switches also include a position to connect both the house and chassis batteries together, typically used for charging the house batteries from the alternator when the vehicle is running.
Battery Switch Functionality in Preventing Battery Drain
A common problem with travel trailers is slow, persistent battery drain caused by small electrical draws from devices even when the trailer is not in use. These parasitic loads, like low-level current draws from clocks or sensors, can eventually deplete your batteries, leaving you with a dead battery when you’re ready to use your trailer. The battery switch helps to prevent this.
By switching the house batteries to the “off” position when the trailer is not in use, you completely cut off power to these parasitic loads, preserving the charge in your house batteries. This is especially important for extended periods of storage. Leaving the batteries connected can result in a completely discharged battery, leading to costly replacements or repairs.
Consider a situation where you store your trailer for several months. With the switch “off”, your batteries will maintain a significantly higher charge, potentially avoiding the need for a battery charger or jump start before your next trip.
Battery Switch Role in Protecting Sensitive Electronics
Beyond preventing battery drain, the battery switch also plays a role in protecting sensitive electronic components within your trailer. By isolating the house batteries, you prevent potential voltage spikes or surges from affecting these components. For instance, a short circuit in one part of the trailer’s wiring could potentially damage other connected devices. With the battery switch “off”, the affected circuit is isolated, limiting the extent of the damage.
This protection extends to various components, including your refrigerator, water pump, and lighting systems. Imagine a scenario where a faulty light fixture causes a short circuit; with the battery switch in the “off” position, the damage would likely be limited to the light fixture itself, rather than potentially cascading through the entire system.
Operating the Battery Switch Safely
Properly operating your travel trailer’s battery switch is crucial for preventing electrical hazards and ensuring the longevity of your battery system. A simple mistake can lead to damage or even injury. This section details a safe and effective procedure.
Operating the battery switch involves a simple on/off action, but the surrounding steps are crucial for safety. Always remember to prioritize safety to avoid potentially dangerous situations.
Step-by-Step Procedure for Safe Battery Switch Operation
This procedure Artikels the necessary steps to safely operate your travel trailer’s battery switch, minimizing the risk of electrical issues.
So, you’re an audiophile who loves to travel? Awesome! Check out this guide on creating the perfect audiophile travel setup to ensure your sonic adventures never stop. It’s all about packing smart, and protecting your gear. Speaking of protection, don’t forget travel insurance! Securing good coverage with Aon travel insurance is a must-have before you jet off, ensuring peace of mind for your valuable equipment and your trip overall.
Happy listening, and safe travels!
- Pre-Operation Check: Before touching anything, visually inspect the battery and surrounding area for any signs of damage, corrosion, or loose connections. Look for any leaking battery acid or frayed wires. If you notice anything amiss, address the issue before proceeding.
- Identify the Switch: Locate the battery switch clearly labeled in your travel trailer. It’s often near the battery itself or in a readily accessible electrical compartment.
- Turn Off Appliances: Ensure all electrical appliances and devices within the trailer are switched off and unplugged. This prevents potential short circuits or surges when the battery is disconnected or reconnected.
- Operate the Switch: Carefully turn the battery switch to the “OFF” position. This will disconnect the battery from the trailer’s electrical system. If it’s a multi-position switch (like an “On,” “Off,” and “Aux” position), make sure it’s clearly in the “Off” position.
- Post-Operation Check (Off): After turning the switch off, double-check that no power is being drawn from the battery. You can test this by trying to turn on a light or other appliance. If it doesn’t work, the battery is successfully disconnected.
- Operate the Switch (On): When ready to use the trailer’s electrical system, carefully turn the switch to the “ON” position. This reconnects the battery to the trailer.
- Post-Operation Check (On): After turning the switch on, test a few appliances to ensure power is restored correctly. If the appliances function normally, the battery is successfully reconnected.
Safety Precautions
Several precautions can significantly reduce the risk of electrical hazards when working with your travel trailer’s battery switch.
- Wear Protective Gear: Always wear safety glasses and gloves when working near batteries. Battery acid is corrosive and can cause serious injury to eyes and skin.
- Avoid Sparks: Never use tools or equipment that could create sparks near the battery or switch. Sparks can ignite flammable gases produced by the battery.
- Proper Ventilation: Work in a well-ventilated area when working with batteries. Battery gases are toxic and can be harmful if inhaled.
- Proper Connection: Ensure all battery connections are clean, tight, and corrosion-free. Loose or corroded connections can create resistance, leading to overheating and potential fire hazards.
- Consult a Professional: If you’re unsure about any aspect of operating the battery switch or if you encounter any problems, consult a qualified RV technician or electrician.
Troubleshooting Common Battery Switch Issues

Your travel trailer’s battery switch is a critical component, and problems with it can leave you stranded. Understanding common issues and how to troubleshoot them is essential for maintaining power and preventing unexpected breakdowns. This section will guide you through identifying and resolving some of the most frequent problems.
Switch Failure
A faulty battery switch is a primary cause of power problems. Over time, the internal mechanisms can wear out, leading to intermittent or complete power loss. The switch might fail to make a proper connection, or it might become stuck in the “off” position. Troubleshooting a potentially failed switch involves visual inspection for any obvious damage, followed by testing continuity.
Using a multimeter, set it to the continuity setting (usually represented by a diode symbol). Touch the probes to the terminals on either side of the switch. A continuous beep indicates a good connection; no beep means the switch is faulty and needs replacement. If the beep is intermittent, the internal contacts are likely worn and require replacement or repair.
Remember to disconnect the battery’s negative terminal before conducting any electrical tests.
Loose Connections
Loose connections at the battery switch or its wiring are another common source of power issues. Vibration from travel can loosen terminals, causing intermittent or complete power loss. Corrosion on the terminals can also increase resistance and lead to poor connections.Troubleshooting loose connections involves carefully inspecting all terminals and wires connected to the switch. Tighten any loose connections using appropriate tools.
If corrosion is present, clean the terminals using a wire brush and a battery terminal cleaner. Apply a corrosion inhibitor to prevent future issues. Always ensure a snug and secure connection before reconnecting the battery.
Corrosion
Corrosion is a silent killer of electrical connections. It builds up over time, increasing resistance and eventually leading to complete failure of the circuit. Corrosion is particularly prevalent in humid or salty environments.Troubleshooting corrosion requires thorough cleaning of the affected terminals and connections. Use a wire brush to remove corrosion from the battery terminals and the switch terminals.
A battery terminal cleaner can help remove stubborn corrosion. After cleaning, apply a dielectric grease to prevent future corrosion. Inspect all wiring for corrosion; if found, replace the corroded sections. This is crucial because corrosion can weaken the wire, leading to potential fire hazards.
Troubleshooting Table
| Symptom | Probable Cause | Solution |
|---|---|---|
| No power to appliances | Faulty battery switch, loose connections, corrosion | Test the switch for continuity, inspect and tighten connections, clean and treat corrosion |
| Intermittent power | Loose connections, corrosion, partially failed switch | Tighten connections, clean and treat corrosion, replace the switch if necessary |
| Blown fuse or breaker | Short circuit caused by corrosion or damaged wiring | Check and replace the fuse or breaker, inspect wiring for damage and corrosion |
| Switch feels stiff or unresponsive | Mechanical failure of the switch | Replace the battery switch |
Battery Switch Maintenance and Upkeep
Regular maintenance of your travel trailer’s battery switch is crucial for ensuring its longevity and reliable operation. Neglecting this simple task can lead to premature failure, potentially leaving you stranded without power. A proactive approach, involving periodic cleaning, inspection, and lubrication, will significantly extend the life of your switch and prevent costly repairs.Proper maintenance prevents corrosion, a common enemy of electrical connections.
Corrosion buildup on the terminals and switch contacts increases resistance, leading to reduced power flow, overheating, and ultimately, switch failure. Keeping the switch clean and lubricated ensures smooth operation and prevents the build-up of corrosive elements.
Cleaning and Inspection Schedule, Battery switch on travel trailer function
A regular maintenance schedule will help keep your battery switch in top condition. Aim for a thorough cleaning and inspection at least twice a year, or more frequently if you use your travel trailer extensively in harsh environments (e.g., coastal areas with high salinity or areas with frequent rain and humidity). This involves visually inspecting the switch for any signs of damage, loose connections, or corrosion.
Use a wire brush to gently clean any accumulated dirt or debris. Pay close attention to the terminals and the switch contacts themselves. A simple visual check can often catch problems early, preventing more serious issues down the line. If you notice any significant corrosion, you may need to use a corrosion remover specifically designed for electrical components.
Always disconnect the battery before cleaning or working on the switch.
Preventing Corrosion
Corrosion is the biggest threat to the lifespan of your battery switch. To combat this, after cleaning, apply a thin layer of dielectric grease to the terminals and switch contacts. This grease acts as a barrier, preventing moisture and contaminants from reaching the metal surfaces and causing corrosion. Make sure the grease is specifically designed for electrical applications; it should be non-conductive.
Regular application of dielectric grease, along with keeping the area around the switch clean and dry, will significantly reduce corrosion and extend the switch’s lifespan. Consider using a protective cover or sealant over the switch if it’s exposed to the elements. This added layer of protection will further reduce the risk of corrosion.
Extending Battery Switch Lifespan
Several practices contribute to extending the life of your battery switch. Beyond regular cleaning and lubrication, avoid over-tightening the terminal connections. Over-tightening can damage the terminals and lead to premature wear. Similarly, ensure the switch is correctly installed and securely mounted to prevent vibration and movement that can loosen connections over time. Avoid leaving the switch in the “off” position for extended periods, especially if the battery is connected.
While this doesn’t directly damage the switch, it can contribute to battery sulfation and ultimately impact the overall system’s health. Regularly check the battery’s water levels (if applicable) to ensure proper operation and prevent issues that could indirectly affect the switch.
Wiring Diagrams and Schematics
Understanding wiring diagrams is crucial for safely working with your travel trailer’s electrical system, especially when dealing with the battery switch. These diagrams provide a visual representation of how different components are connected, allowing for easier troubleshooting and maintenance. A clear understanding of the diagram will help you identify potential problems and safely perform repairs.
Wiring diagrams use standardized symbols to represent different parts of the electrical system. These symbols are consistent across most diagrams, making them relatively easy to interpret once you familiarize yourself with the basics. Being able to read these diagrams is a valuable skill for any RV owner.
Typical Travel Trailer Battery Switch Wiring Diagram
The following describes a simplified diagram illustrating a common battery switch setup. Remember, specific wiring can vary depending on your trailer’s make and model. Always consult your owner’s manual for the most accurate representation of your RV’s wiring.
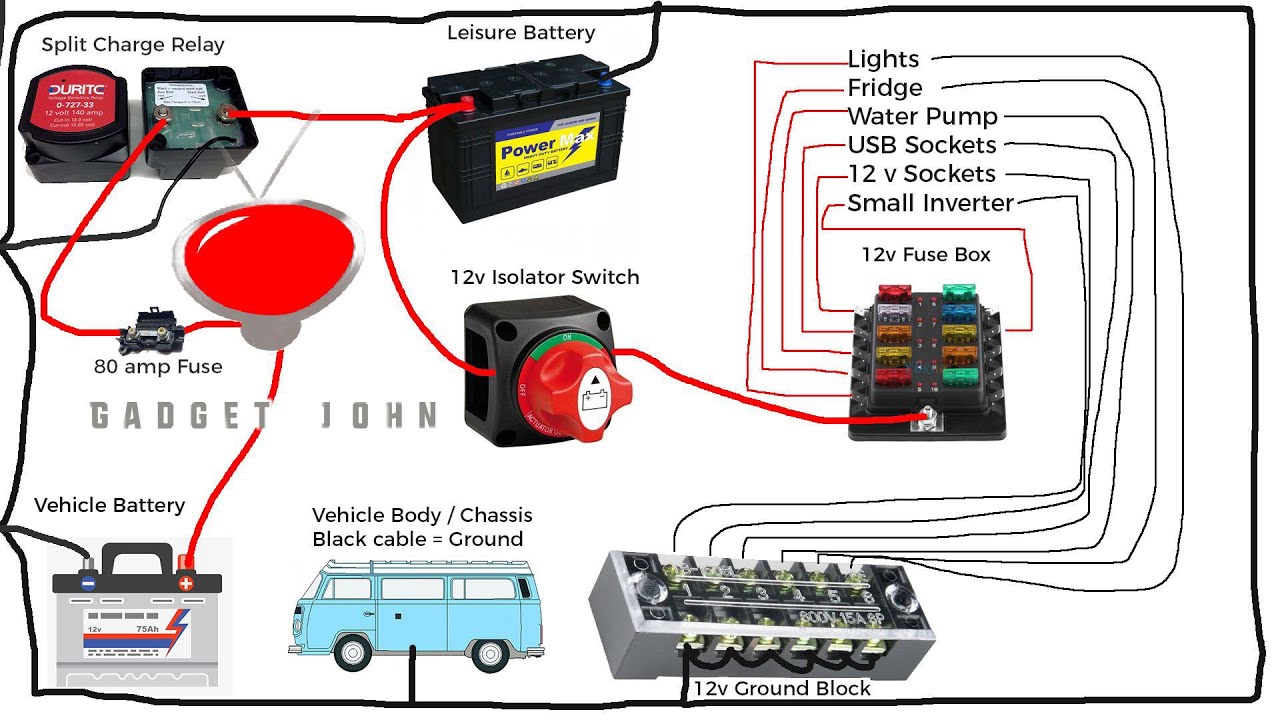
Imagine a rectangle representing the battery switch. Lines represent wires. We’ll use simple labels to identify components.
- Battery (+) Terminal: A line connects the positive (+) terminal of your trailer’s battery to one side of the battery switch. This is the power source.
- Battery Switch: This is the central component, represented by the rectangle. It controls the flow of electricity.
- Battery (-) Terminal: A line connects the negative (-) terminal of your trailer’s battery directly to the chassis ground. This completes the circuit.
- Positive Output to Trailer: A line extends from the other side of the battery switch to the positive bus bar or distribution point in your trailer. This provides power to the trailer’s 12V system when the switch is ON.
- Chassis Ground: The negative terminal of the battery is connected directly to the trailer’s chassis ground. This provides a return path for the electricity.
Interpreting a Travel Trailer Wiring Diagram
When interpreting a wiring diagram, start by identifying the key components, such as the battery, the battery switch, and the various circuits in the trailer. Follow the lines to see how these components are interconnected. The battery switch will typically be shown as a central point, with lines branching out to different parts of the trailer’s electrical system. The position of the switch in the diagram usually indicates its control over the power flow.
For instance, if a line from the switch goes to a specific appliance, the switch controls that appliance’s power.
A typical diagram might show multiple circuits originating from the positive bus bar, each representing a different appliance or system (lights, water pump, etc.). Tracing these lines helps you understand how the battery switch affects each circuit. If the switch is “OFF,” all lines leading from the switch to the trailer will be effectively disconnected, preventing power from reaching any appliances.
Upgrading or Replacing a Battery Switch
Upgrading or replacing your travel trailer’s battery switch can significantly improve your camping experience, offering enhanced safety and convenience. This process involves careful consideration of several factors to ensure you choose the right switch for your needs and install it correctly. Failing to do so could lead to electrical problems or even safety hazards.Replacing your battery switch is a straightforward task for those with basic electrical knowledge, but always prioritize safety and, if unsure, consult a qualified electrician.
Factors to Consider When Upgrading or Replacing a Battery Switch
Choosing the right replacement or upgrade depends on several key factors. Amperage rating is crucial; it determines the maximum current the switch can handle. A switch with too low an amperage rating will overheat and potentially fail, posing a fire risk. You’ll also need to consider the type of switch: a simple on/off switch is sufficient for basic needs, but a more advanced switch with multiple banks (allowing separate control of different battery banks) might be preferable for trailers with larger battery setups or those running more sophisticated appliances.
Finally, the physical size and mounting configuration must match your existing setup.
Step-by-Step Guide to Safely Replacing a Battery Switch
Before beginning any electrical work, disconnect the negative battery cable to prevent accidental shocks or short circuits. This is the most crucial safety step. Next, carefully remove the old switch, noting its wiring configuration. Take clear pictures or make detailed diagrams if needed. This is extremely helpful if you’re unsure of how to reconnect things.
Install the new switch, ensuring it’s securely mounted. Then, reconnect the wires according to your diagram or pictures, paying close attention to the positive and negative terminals. Double-check all connections before reconnecting the negative battery cable. Finally, test the new switch to confirm it’s functioning correctly.
Benefits of Upgrading to a Higher-Capacity or More Advanced Battery Switch
Upgrading to a higher-amperage switch provides greater safety and allows you to handle increased electrical loads. For instance, if you add more appliances or upgrade to a larger battery bank, a higher-capacity switch prevents overheating and potential failure. More advanced switches, such as those with multiple banks, offer improved control and flexibility over your power system. This is particularly useful if you have separate battery banks for house power and starting the trailer’s engine.
For example, you could isolate a deep-cycle house battery bank while using a separate starting battery. This prevents accidentally draining your house batteries when cranking the engine. Some advanced switches even include features like integrated circuit breakers for additional safety.
Mastering your travel trailer’s battery switch isn’t rocket science, but understanding its function is vital for a smooth and safe RV experience. By following the simple steps for operation and maintenance Artikeld here, you can avoid costly repairs and ensure your batteries are always ready when you are. Happy travels!
Helpful Answers
How often should I check my battery switch?
Before and after each trip is a good rule of thumb. Regular visual inspections for corrosion or loose connections are also recommended.
What does it mean if my battery switch is making a clicking noise?
This often indicates a problem with the switch itself or a loose connection. Check all connections and consider replacing the switch if the problem persists.
Can I use any type of battery switch in my travel trailer?
No, the amperage rating of the switch must match or exceed the amperage draw of your batteries and appliances. Using an incorrectly rated switch can lead to overheating and fire hazards.
My batteries are still draining even with the switch off. What could be the issue?
A parasitic draw is likely. This means something in your RV is drawing power even when it shouldn’t be. You’ll need to systematically check your appliances and wiring to find the culprit.
